Quantcast
Channel: fnord software blog
Viewing all 61 articles
Browse latest View live

Making a Linear ICC Profile

$
0
0
ICC Profiles usually describe devices, and real devices are never linear. In other words, they generally have a gamma other than 1.0, and usually some sort of custom curve you might measure with a spectrophotometer.

But sometimes you want a linear ICC profile. Perhaps you want to set up a linear color space to use in After Effects 7. Or maybe you rendered a 16-bit file into a linear color space using a 3D program and need to tag it that way. Here I'll show you how to use Photoshop to create a linear color profile.

1) Go to the Color Settings dialog (Edit > Color Settings…)

2) If necessary, click on the "More Options" button.

3) Check the profile you have set for your RGB working space. It defaults to sRGB (in Adobe parlance "sRGB IEC61966-2.1"). Whatever profile you set here is the profile that we will be making a linear version of.

4) With your profile set, go to "Custom RGB…" in the same menu. A dialog will pop up.


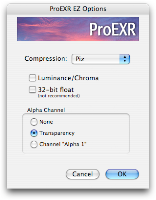
5) The Custom RGB dialog will be filled in with settings from the profile you previously selected. In many cases the Gamma field will be an approximation, but it doesn't matter because you want to set it to 1.0, making this profile linear.

6) Make sure you edit the Name field. Call the new profile something like "Linear sRGB".

7) You can leave the rest of the fields as they are. Click OK.


8) Your custom profile is now selected in the menu, but it still lives only in Photoshop. We want to save it out by going to "Save RGB…" in the same menu. This will give you a Save As… dialog. You should drop the profile someplace it will be seen by other applications, such as:

Mac: /Library/Application Support/Adobe/Color/Profiles/
Win: C:\Program Files\Common Files\Adobe\Color\Profiles\

Give the profile a reasonable file name, although the name you used previously in #6 is what will appear in menus. You probably want to name the file the same.

9) With the profile saved, you probably would prefer to Cancel out of this dialog box, assuming you don't want to set a linear profile to your Photoshop working space.


And with that you've created a linear profile to be used in any profile menu. ICC profiles in general consist of a combination of color primaries and response curves. The color primaries describe the actual wavelength of light that comes out of a display when it is showing pure red, green, blue, or white. The response curves (which could be a simple gamma curve) describes the transition from red/green/blue to black.

In the process described above, we adopt the color primaries from a profile and set the response curves to linear. If we convert an image from the original profile to the linearized profile, the result is a simple Gamma-style transformation that doesn't involve channel cross-talk and can easily be reversed.

Converting to 32bpc in Photoshop Without Altering Pixels

$
0
0
Many people have a problem with color management. They think that when they open a JPEG in Photoshop, the pixels in the file should be the pixels that are shown on screen, but this is often not the case! If you have an sRGB image being viewed on your Mac monitor, Photoshop will darken the display pixels to show what the file would look like on a true sRGB monitor. Even if you think there's no ICC profile for the image, Photoshop will use the working space designated in Color Settings (usually sRGB). In general, this is probably what you actually want, but some people find it unsettling.

In another attempt to force users to do the right thing, Photoshop insists that all 32 Bits/Channel (floating point) images use a linear profile. When you convert your 8-bit sRGB image to 32-bit, Photoshop will linearize the pixels while simultaneously assigning a linear profile. The net result is that the image looks the same, even though the pixel values have changed. Again, this is usually what you want.

Except what if you don't want the pixels to to change, other than get converted to a higher bit depth? It is possible to do this, but it involves tricking Photoshop a little. I'll explain below.

To start, we'll take the famous Marcie image. This is a 10-bit Cineon file in Log space. Photoshop will open it as a 16-bit file without a profile (which means it uses your RGB working space). Marcie is a useful example for us because many film users still paint on Log images.

If you set the Photoshop Info Palette eyedropper to 32-bit mode and sample the grey LAD patch, you'll see values of 0.435 for that area. Now convert this file to 32-bit mode and sample again. Even though the image does not appear to have changed, the LAD patch is now reading 0.159. As mentioned above, the pixels have been darkened while the profile was linearized.

To convert from 16- to 32-bit mode without the change, revert to the original file and follow these steps:

1) Assign a linear profile (Edit > Assign Profile…) that you've previously created. When you do this, the image will appear much brighter, but using the info palette you can verify that the LAD patch is still 0.435. The Assign Profile function doesn't alter pixel values, only how they are displayed.

2) Now convert to 32-bit mode. The image will appear unchanged, which is to say too bright. But when you sample the LAD patch, you'll see that it has retained its value of 0.435. Photoshop usually converts from whatever profile you're using to a linear profile, but because we told it we already had a linear profile, no change takes place.

3) Your pixels are now in floating point Log space. If you save this image to an OpenEXR file, most file readers will assume linear space and brighten the image as Photoshop is doing. It will be up to you to make sure the Log pixels are treated properly in whatever program you're sending them to.

While Photoshop always defaults to using color management, there is a way to turn it off. By going to View > Proof Setup > Monitor RGB (make sure View > Proof Colors is also on), Photoshop will treat the file like is has the same profile as your monitor, so no transform will take place. In the above example, this would show pixels in Log space. You can also use View > 32-bit Preview Options to view a file with Gain and Gamma in 32-bit mode.

This workflow is currently being used in production by film studios who want to paint in Log, but export an OpenEXR file using ProEXR.
The part of the equation that is really missing is a way to convert from Log to floating point linear in Photoshop so that the EXR can have its proper linear values. Hopefully one day there will be a way to do this.

Update: Now there's a way!

ProEXR 1.3 released

$
0
0
A new version of ProEXR is available, adding a key feature that has been requested by users. Whereas the Photoshop plug-in already had a mechanism for effecting the way alpha channels were handled, we've now bumped the feature out of Easter Egg land and into legitimacy via a shiny new dialog.


The dialog does not appear by default. As before, you access the feature by holding down the option (Mac) or alt (Win) key. But now the settings are made clear as day and you can change the defaults to whatever you like. You can even make the dialog appear every time if you crave more modal UI interaction than you're currently getting.

ProEXR 1.3 also includes a variety of other small fixes. Needless to say, we recommend everyone switch to it (without any upgrade fee, of course). Enjoy!

exrdisplay for After Effects

$
0
0
When you work with linear floating point images in virtually any program, the standard conversion from the linear color space to your screen is usually some sort of gamma curve, a standard image operation. But a trained eye may notice that in some cases, OpenEXR files appear slightly differently. One example is the thumbnail previews shown by Mac OS X. In this case, the curve used is from ILM's exrdisplay program. In the sample below, standard gamma is on the left and exrdisplay is on the right:

Notice how in the exrdisplay version, the sky is not completely blown out. Overbright pixels have been brought into range and do not clip as harshly as they would with a standard gamma curve. ILM is using a modified gamma function and added an adjustable "knee" to make this happen.

Ordinarily this different curve was only of passing interest to me, but then I was helping out some friends put together a pipeline for an Inferno, and found that it also uses this curve, which made it necessary to replicate the same color operation in After Effects, which made me write this plug-in:

It has all the same controls as the exrdisplay command-line program, in addition to a few extras. For one thing, the dithering that exrdisplay always uses is optional in the plug-in.

But more interestingly, I've included a checkbox to apply the inverse function. This means you can take a regular image such as a JPEG and convert it to linear space using this plug-in, with control over the knee which will push some brighter pixels into overbrights. And then when you use the plug-in on the other end with the same settings, all values will round trip.

Anyway, I needed this for my personal use, so thought I'd share. Enjoy!

Download
Mac | Win

ProEXR ships with After Effects CS4

$
0
0

OK people, this is big, real big.

It's been officially announced: the free OpenEXR plug-ins I've been shipping for over a year are now going to be appearing in the next version of After Effects! So no longer will you have to replace Adobe's plug-in with the fnord one, because they will be the same! EXtractoR and IDentifier will also be included. You can read more about it here, here, here, and here.

And since you asked, yes, they will be remaining open source, and yes, I will continue to update them on the fnord web site as necessary.

Not included in After Effects will be the Comp Creator, which you can still download. And of course, the ProEXR Photoshop plug-in is separate.

This is really a big honor, and I want to thank the AE team for making it happen. I have had a love affair with After Effects for many years and it's hard to believe my plug-ins are now a part of it. Pinch me!

Update: See my credit in the AE secret about box (hold down option/alt while doing About After Effects). Whee!


Cineon Converter for Photoshop

$
0
0

This free plug-in fills a missing link in the Photoshop film production pipeline. It applies Kodak's standard log2lin transfer function to a log Photoshop layer, such as one you might get from opening a Cineon file. This is the same operation found in Nuke, Shake, Fusion, and the After Effects Cineon Converter.

In order to convert a log Photoshop document to a linear one:

1) Convert the document to 32-bit floating point, without altering pixel values.

2) Apply the Cineon Converter to each layer.


The Cineon Converter can be scripted using Photoshop Actions. A sample JavaScript is included showing how to automatically apply an Action to each layer in the file.

Once linearized, your Photoshop document is ready to be saved into a linear floating point file format (can anybody think of one?) and brought into your favorite compositor in the proper color space.

Enjoy!

Download

ProEXR 1.5 Beta

$
0
0
Well, 2009 was quiteayear. Just before it's over, we have a public beta of ProEXR for Photoshop to try out here.

It's been completely re-written to read and write EXRs as fast as possible, taking advantage of all the memory you've got on your system (including you 64-bit Windows users).

There's also a new "ProEXR EZ" plug-in for people who find the whole multi-layer EXR thing a little overwhelming but want the extra control ProEXR gives you over alpha channels. ProEXR EZ even lets you put the Alpha in the Channels palette, if that floats your boat.

Most users will want to have either regular ProEXR or ProEXR EZ installed, not both. But if you do install both and open a file, ProEXR will be used unless you force EZ in Photoshop's Open dialog. When saving, you can easily pick one or the other.

Please send in bug reports and comments so we can make this the most solid release yet!

log2lin and lin2log in Photoshop

$
0
0
Some time ago I wrote a couple blogposts about working with Log images in Photoshop and how you can convert them to 32-bit linear for saving out as OpenEXR. It involves a little bit of Photoshop trickery unfortunately, but it works and you can set up actions and scripts to do it in one step, which I'd recommend.

One oversight on my part, however, was not describing how to go from 32-bit linear back to 16-bit Log. It's similar to doing the log2lin steps in reverse, but not quite. So, starting with a good looking 32-bit linear image...

1) Use the Cineon Converter to apply a lin2log operation to each layer. Typically you'll use the default settings, but switch the conversion to lin2log. After you do this, your image will look bright and washed out because it's been converted to Log space but is still getting the gamma correction Photoshop does to all 32-bit images. Don't worry.

2) Here's the tricky part. We have to convert back to 16-bit without Photoshop changing any pixels. During this mode switch, Photoshop converts your linear 32-bit image into whatever color space is set as your default RGB working space. So you have to go into the Color Settings dialog and temporarily change that to the linear color profile you've previously created.


3) Now change the image mode from 32-bit to 16-bit. Thanks to the previous steps, your pixels will now be in 16-bit Log space. When asked about Exposure and Gamma, leave those values untouched (0.0 exposure and 1.0 gamma). The image will not look any different (which is always the preferred behavior for switching image modes) and the pixels will not change values because of that linear profile.

3.5) You probably don't want a linear profile as the default working space, so change your Color Settings back to their original values, usually with sRGB as the default RGB working space. You probably notice this is kind of a pain - all the more reason to script it via JavaScript and Actions.

4) Open the Assign Profile dialog and assign a better profile to this image. If you apply sRGB (or tell Photoshop not the manage the document), you will see the image in Log space. You may also choose another profile to do some sort of film preview, such as the Theater Preview profiles that ship with After Effects.

And that's it. You should be able to start with a 16-bit Log file, use the varioussteps to convert it to 32-bit linear, use these steps to convert it back to 16-bit log and arrive at exactly the same image you started with, which is always an important test for any color pipeline.


For the record, you're not crazy if your have a 32-bit linear workflow but want to paint in log space. For one thing, many of Photoshop's tools aren't available in 32-bit (hello, Curves?!?). And some of the tools that are in 32-bit have not been appropriately tweaked for linear (I'm looking at you, Levels). Finally, if you have some film preview profiles, Photoshop can't use them in 32-bit mode like After Effects can.

So by painting in Log, you 1) reclaim some of your favorite tools, 2) can use film preview profiles, and 3) can still paint overbrights because 100% white in log space maps to 13.52 in linear. But be careful! Realize that layers will composite in Log space differently than in linear space, especially if you have soft feathered edges or use transfer modes such as Screen. If you flatten your layers before converting to 32-bit this won't be a problem, but if you need the layers to be separate, make sure you test everything first.

ProEXR 1.5 released

$
0
0

Now that Adobe has shipped Photoshop and After Effects CS5, it's time for ProEXR to join the party. Available now is version 1.5, complete with 64-bit versions for Mac and Windows. In fact, the Photoshop plug-in has been rewritten from the ground up to take full advantage of all the memory you can throw at it and load those giant EXRs as fast as I know how. As usual, this update is free.

After Effects CS5 ships with 1.5 pre-installed (shout out to my Adobe pals!) and CS3/4 users can update their plug-ins with 32-bit versions, also included.

But wait, there's more. Also included is ProEXR EZ for those Photoshop users who wanted extra alpha control but less multi-layer confusion. Not to mention countless small improvements and optimizations.

Enjoy!

NaNny

$
0
0

If you're unlucky enough, you may have sampled a pixel like the one shown above in After Effects. While 32-bit floating point mode has brought us linear color space and overbrights, it does have a hidden dark side. Negative pixel values can be perplexing, but seeing a NaN (Not a Number) or inf (infinity) floating point value can really make your head spin.

These things can cause all kinds of problems if they find their way into a comp. After Effects has safeguards to prevent them from being created, but they can slip in if your renderer burned them into a floating point format such as OpenEXR.

If you see one of these things, the first thing you should do is write an angry email to the developer of your rendering software, because they have a bug to fix. The second thing is apply our free plug-in, NaNny, which will replace the NaNs and infs with the floating point value of your choosing. Also included in the download is an EXR file chock full of these nasties if you'd like to experiment with them a bit.

Download
Mac | Win

j2k 2.5 released

$
0
0

Have just posted an update to our j2k plug-in for Photoshop and After Effects. The main change is the addition of a "Digital Cinema" option when saving files. This will make JPEG 2000 files compatible with the DCI specification. From there you can use a tool like OpenDCP to finish the process of creating an MXF file ready for digital projection.

Also new is a real PDF manual. Of course, the plug-in is still free. Enjoy!

SuperPNG 2.0 released

$
0
0
SuperPNG is the first plug-in I ever wrote. Back in 2002, Photoshop and After Effects had 16-bit color modes, but couldn't read or write a 16-bit PNG. So I set out to fill the void, learning a lot in the process.

Within a few years, Adobe filled the holes and I figured SuperPNG was destined for retirement. Working in visual effects, I also found myself no longer using a 16-bit integer format in production, preferring 16-bit float via OpenEXR. SuperPNG was all but forgotten—I didn't even have it installed myself.

But then the other day I went to save a PNG in Photoshop and noticed a glaring omission: no ICC profile support. I found it astounding that Adobe, one of the founding members of the ICC, had overlooked it in PNG. Time to dust off SuperPNG.

And then I have also gotten so accustomed to being able to control alpha channels in ProEXR EZ, I decided I had to add that feature to SuperPNG. So now the options dialog lets you choose between using transparency or the channels palette as the source for your alpha. Hold down shift when opening a PNG, and you get an import options dialog as well, letting you direct that alpha however you wish.

For more information, see the PDF manual, also new in this version. Quite an update for a free plug-in!

Enjoy!

Export ICC

$
0
0
Here's a simple Photoshop plug-in for exporting the ICC profile from your document. Sometimes an ICC profile is embedded in a file you've received and you'd like to save it out and install it on your system. This plug-in will let you do that.

This code was originally part of a little collection called xMeta, now retired from the fnord web site. But here's the useful part, with a Windows version appearing for the first time. Free, of course. Enjoy!

Download
Mac | Win

OpenEXR command line tools

$
0
0
Eagle-eyed visitors to the fnord OpenEXR page may have noticed that there's been links to the OpenEXR utilities for a while. These are programs that are included with OpenEXR in source code form, but unless you're a programmer you probably haven't been able to use them. Heck, even if you are a programmer you may not have bothered to build them, as doing so involves building FLTK, downloading the nVidia Cg Toolkit, and other chores. So I've done the work for you and posted the result.

There are some useful tools in here. For the reference implementation to see how an EXR should look, use exrdisplay. Or playexr can play back an EXR sequence in real time and let you adjust exposure on the fly. Another favorite is exrmaketiled for converting a regular scanline EXR into a tiled, mipmapped image for the benefit of a 3D program that can take advantage.

As I said, these were written by Florian Kainz and his team at ILM, not me. I'm just posting the binaries to give more people access to them. They are all run from a command shell, so time to get comfortable with it if you haven't already. I've just got Mac and Windows versions here—I figure you Linux hackers can handle building them on your own. Enjoy!

Download
Mac | Win

ProEXR AE

$
0
0
New in version 1.6 of ProEXR is a new plug-in for After Effects: ProEXR AE. On one hand, this is the old ProEXR Comp Creator plug-in with a new name. But installing this plug-in also will add an extra option to your list of output formats.


Funny how sometimes one tiny little UI widget can indicate a whole world of possibilities. Yes, ladies and gentlemen, choosing "ProEXR Layers Sequence" will render all the layers of your After Effects comp into a multi-channel OpenEXR sequence. And of course each file will include our blob of layer data so it can be reconstructed in Nuke, Photoshop, or even back in AE.

Needless to say, this is somewhat beyond the scope of a typical After Effects file module, so perhaps it should be considered experimental for now. If it behaves oddly, please send email telling me so. And do remember that it follows the same layer naming conventions followed by the Photoshop plug-in (more on that in the manual).

To take advantage of this functionality, you'll need a ProEXR serial number. (It will run in trial mode for 15 days, like the Photoshop plug-ins.) You do not need a serial number to use the comp building functionality however.

Enjoy!

ProEXR 1.6 released

$
0
0
A modest 0.1 version increase for a pretty significant update to ProEXR. It includes, of course, any number of minor bug fixes, but also a few pretty significant features. The update is free, as usual.

1. Nuke Comp Builder script
Since the beginning, files saved with ProEXR in Photoshop have contained a little blurb of data detailing the layer arrangement, transfer modes, and other things beyond the scope of the EXR format. ProEXR for Photoshop and After Effects could use this data to rebuild their project exactly as it was saved, but for Nuke you were forced to do it manually. Well, no longer—ProEXR includes a Python script that will read the data (requires Nuke 6.3) and build a comp for you. Linux users, download it here.

2. AE plug-in optimizations
A significant amount of work was put into the After Effects plug-ins to try to eke more speed out of them, particularly when reading layers using EXtractoR. I won't bore you with the details, but in some tests I've seen a 40% improvement. Feel free to swap these in for the ones that ship with AE. Don't worry, they're 100% project compatible with the previous versions you've already been using.

3. Memory Mapping
A new option has been added when reading files: "Memory Mapping." What this means is that the entire raw EXR file is loaded into a memory buffer before it is decompressed. Some users have found that performing one big read can speed things up tremendously on certain networks. Access this option from the input options dialog in Photoshop, or it can be set by editing the Preferences file in AE. More details in the manual.

4. Render layered EXR files from After Effects
This feature merits its own blog post, don't you think?

j2k 2.6

$
0
0
The last release of j2k added support for Digital Cinema files, but I've since received some user feedback asking for more control over DCI bit rate. Ask and ye shall receive:


The controls are modeled after those found in OpenDCP. It defaults to a megabits per second model, but you can also specify a per-frame size in kilobytes if you prefer. The slider tops out at the DCI spec maximum, but you can enter a higher number in the text field if you wish.

As usual, j2k is free. Enjoy!

ProEXR EZ is Free

$
0
0
A fact of life for plug-in developers is that a good idea for a plug-in today may become a new feature in the main program tomorrow. If you have saved an OpenEXR file out of the Photoshop CS6 public beta, you will have seen this dialog:
Which might remind you of another dialog:
So thank you, Adobe, I'm glad that you decided to give Photoshop users some more options for saving EXR files. And I'm glad I could help them out in the meantime with ProEXR EZ, which I'm now making free. Download ProEXR 1.7 and run ProEXR EZ without a serial number, even in versions of Photoshop prior to CS6.

But even if you're using CS6 and don't need to read or write multi-channel EXR files, you'll still want to use ProEXR EZ instead of Photoshop's built-in OpenEXR module. Our plug-in has these advantages:
  • Photoshop's input options dialog comes up every time, while ProEXR EZ's only comes up if you hold down the shift key. You can also set a preference to make it come up every time if you want and set your own default settings.
  • ProEXR EZ lets you write Luminance/Chroma images, while Photoshop can only read them.
  • ProEXR EZ let you write files with Zip16, B44, and B44A compression, which Photoshop has left out for some reason.
  • ProEXR lets you write out files in 32-bit float for the rare time when EXR's 16-bit float is not enough.
  • ProEXR EZ includes the ProEXR File Description that tells you about all the channels and metadata in the EXR file you're using.
  • ProEXR EZ reads and writes EXR color space information while Photoshop does not.


As a refresher, the following plug-ins are free in ProEXR:
  • ProEXR EZ for Photoshop
  • OpenEXR, EXtractoR, IDentifier plug-ins for After Effects (version 1.5 ships with AE)
  • ProEXR Comp Creator for After Effects (part of ProEXR AE)
The following ProEXR features require a license:
  • ProEXR for Photoshop (read/write layered EXR files)
  • ProEXR AE (write layered EXR files out of After Effects)
  • ProEXR for Premiere
  • VRimg support (part of ProEXR for Photoshop and ProEXR AE)

ProEXR 1.7 available

$
0
0
Another six months, another two seasons, and another free 0.1 update to ProEXR. Version 1.7 includes some pretty nifty improvements and additions. They are:

1. Premiere Pro plug-in
OpenEXR is beginning to spread beyond the rarified world of 3D rendering and digital compositing. More and more it is being used to send images between editing software and color correction tools, and OpenEXR is also the foundation for the upcoming ACES digital cinema workflow. ProEXR for Premiere lets you import and export OpenEXR sequences in Premiere Pro. It supports timecode, all the EXR compression options, and takes advantage of Premiere's native floating point pipeline.

2. After Effects performance boost
More work has been put into getting performance gains out of the AE plug-ins. In some tests, the new plug-ins are twice as fast as what was released in version 1.6, which was already an improvement over 1.5, the version currently shipping in After Effects. The new OpenEXR, EXtractoR, and IDentifier plug-ins are project-compatible and free, so don't waste any time replacing your current After Effects versions with the latest and greatest.

3. ProEXR EZ is free
No longer be held captive by fnord software's greedy capitalists! More information below.

4. VRimg support
Many VRay users convert their multipass VRimg files to OpenEXR and then open them with ProEXR. Now they can skip a step and open VRimg files directly in Photoshop and After Effects. (Both programs prefer you use the 3-letter file extension ".vri" instead of ".vrimg".)

Enjoy!

OpenColorIO for After Effects

$
0
0
OpenColorIO ("OCIO") is an open source system for managing color in film production pipelines. It was originally created for internal use at Sony Pictures Imageworks, who then released it publicly in July 2010. It now includes an After Effects plug-in that I contributed.

The main advantage of OpenColorIO is that it will function identically across all programs that support it. So if you want to make sure that your color transformations in After Effects match those in Nuke (now shipping with OCIO), this is a way to do it.

Of course, like any open source project, the plug-in is free. Anyone is free to download the code, build it themselves, or contribute a change. Here I've got pre-built versions for you, which I'll try to keep up to date with the evolving OCIO library. A PDF manual is also included.

OpenColorIO version: 1.0.8
Date: 6 January 2013
Mac | Win

Sample Project
Viewing all 61 articles
Browse latest View live